“Have any of you done casting before?” Stacy asked our tiny group of three students. I raised my hand, feeling a little foolish in doing so. My answer was yes, but I couldn’t say I really understood the process.
Of course, my first experience was helping to cast a leg bone of a type specimen fossil found in Egypt…

…That’s a leg bone from Paralititan. The thing is nearly as tall as I am, and honestly, all I remember about the experience is that we were all learning as we went along and that it needed a mother mold to help support the dang thing.
I’d also had my face stolen…er, a cast made of my face…by my friend Lynati, but I’m not sure the experience entirely counts. Still, both factoids helped me to feel not entirely lost as we started to learn varied applications of casting.
The main focus of the class was to create a mold and then cast a breakable bottle, as one would use on stage during a bar brawl. The class stretched over the course of several weeks to allow the varied parts of the cast to be made, so we were also working on other projects.
For our first trick…sorry, project, Stacy handed us each a bit of blue clay and asked us to sculpt a Small Something.
I instantly panicked. Sculpting really isn’t something I do. But then I thought about how a friend sculpted these tiny faces to set into the high corners of her home, rather like easily-missed gargoyles, and I decided to try making something like that. We each created a small box without a lid around our creations, mixed together two ingredients to create our mold, and poured that into the box. (I should say, we used products from Smooth-On – a great company with great customer service that can help you choose the product that best fits your needs. Because there’s a lot of stuff to choose from.)
Once it solidified, we could take the box apart and remove the clay sculpture, leaving a cavity in the shape of the art piece (shown in the first pic below). Then we mixed together two other ingredients and poured that into the cavity, creating a cast. When that had become a solid (second pic), we could remove it from the mold and…yay! A face!
…Not the creepy face I had intended, but that probably says more about me than I’d like it to.
If you look a little closer at my finished face, you’ll see he has a kind of buck tooth thing going on. This means that there’s a small pocket, probably created by air. If I want to cast another face and I don’t want him to look derpy, I can pop a small bit of clay into that upper lip bit to I should say that when you mix your ingredients together to cast your mold, you don’t always have a lot of time to futz around with the liquid, as it wants to start solidifying pretty quickly, generally speaking. So you move faaaaairly quickly, and you try to not waste materials if you can. In our case, if we had mixed a little too much stuff, Stacy had us pour it into other casts to create things like mirrors, stars, and coins. The last two items were then used in the Civic’s production of “Mary Poppins.”

This photo shows better what our sculptures looked like pre-mold, and what the casts looked like as they solidified.
Doing all this small stuff successfully filled in the time while we waited for the bigger stuff to get done….which looked like this!
We each took an empty beer bottle, created a ‘cork’ with a bit of clay, and glued it to a small square base. Then we centered it within a cardboard tube and repeated the steps above.
The cardboard tube was cut on one side to allow us to open it up after the mold was created. In the first group of photos above, you’ll see that there are velcro bands around the tube; this was to hold it together because of that cut. We also hot glued around the outside of the tube where it met up with that square bit of backing so that the mold mix wouldn’t leak out too much. (Bear in mind: Mold making is MESSY.)
Once we had a solid mold around our bottles, we removed the bottle and then created a wax cast of the bottle by pouring hot wax into the mold, waiting a moment, and then pouring the wax back into the original heated container. We did this four or five times, and then we poured more of the mold making material (the blue stuff) into the cavity so that we had a cast of the inside of the bottle. This all took longer than just one class session.
The wax bottle could then be disposed of (although of course I kept mine because WOO I MADE SOMETHING!!!).
The next step was to reassemble our mold so that the thing in the middle was inside the thing to the left, as perfectly centered as we could get it. As it turned out, this was the hardest part of the whole project.
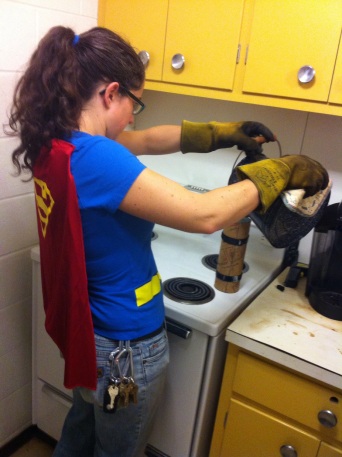
The above picture shows Stacy pouring very hot liquid plastic into one of our molds. We tried the process twice. None of us ended up with a perfect bottle. 😦
Lessons learned:
- If you waited for the cast to be completely cool? It breaks when you try to remove it from the mold.
- The hot plastic will sorta settle into the mold as it cools, but if you top it off? You will get the funky fake ‘cork’ seen in picture #2.
- Related: You can add a second pour. It won’t show as layers in the finished product.
- If you don’t have your inner mold perfectly centered? You end up with the sort of swirly incomplete side seen in picture #3.
- If you are insane enough to want to fix your bottle with superglue? Sure, you can do that…but this material is meant to be easily broken, so guess what? It will break again very easily! This is why the clearer bottle is such a mess.
It may be that the wax bottle process needed to be a little thicker. We were so sure we had our inner molds centered, but I think all three of us had the same thing happen seen in picture #3.
Other things we did in class…we made vases! (These were also used for “Mary Poppins.”)
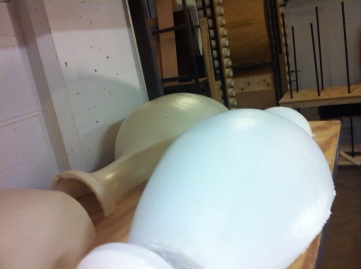
I suck at vases. These used a very solid ‘mother mold,’ which is a sort of cradle that supports the mold to keep your cast from getting wonky and your mold from warping. I wasn’t quite strong enough to pop my vase half out of the mother mold easily. It’s a very finicky process and I should have taken more photos of said process. Alas. The real reason for this photo was that I wanted to show the different finishes. If the vase mold was sprayed with…I believe it was an auto body primer…you got this more paintable surface on your cast.
The other thing we worked on in this class was using a mold to fix a picture or mirror frame. (I personally think this is the coolest thing ever.)
- Look at your frame and figure out what non-broken part of it matches the broken part. You will be making a mold of that bit.
Good bit – broken bit – make a mold!
- When the putty-looking compound is dry, try to anticipate where your casting liquid is going to want to go and create dams with clay to keep it from escaping the mold. I pretty much failed step two, but I can show you why. See how there are all these open ends on the right side of the photo? That’s where the liquid escaped. It’s hard to see all of these areas when the mold is still on the frame. Fortunately, you can add casting material in stages, so I ended up waiting for my first disastrously messy pour to harden up..then I’d add more…wait for THAT to harden up…and add a third batch. Sigh! But I promise, once everything’s done? You can’t tell.

- If desired, you can dye the casting material with something like this – it works kinda like food dye. A little goes a long way.
- If desired, you can also dust the inside of the mold with a powder that will help colour the cast as well. (I apparently forgot to get photos of all of this. Alas. But you can see a bit of the gold powder in my mold.)
- Pour your casting material into your mold. NOTE: This will create a cast that is attached directly onto your original frame!!! For this to go perfectly, you want to make sure your mold is really flush with your frame; otherwise, you’ll have a slight lip at the connection point. (Again, I apparently failed to take a pic of my finished piece, which was not perfect, but for a haunt would be pretty dang ok.)
So this is a huge dang blog post, but goodness, did I love the experience! The materials are a little pricey, although starter kits are readily available online, and I’m really looking forward to being able to finding a practical application for these lessons! 😀


